
About manufactures
Learn how material and product stock levels change when you create a manufacture.

In this article:
- Making batches
- Production statuses
- Auto manufacturing
- Assigning manufactures
- Tracking labor costs
- Useful features
- Troubleshooting
- Manufacture FAQ
A manufacture is a record of the creation of your products, variations, or components. This process involves making a product or batch of products for sale, which is a crucial aspect of your job if you're in manufacturing.
When you create a manufacture and mark it as Completed, any materials you have included in the material list will decrease your on-hand material stock. Your available product stock will also increase simultaneously, based on the quantity you have indicated that you have made.
You can create a manufacture before or after a customer orders, whichever fits your business workflow.
Making batches
When you add a recipe to a product, the manufacture will automatically use the material list from the recipe. This can be handy if you make the same products repeatedly.
If you need to size a manufacture up or down (for example, a batch of 12 soaps instead of a batch of 6, or for a half batch 0.5 instead of 1), you can increase or decrease the manufacture quantity of your manufacture.
Production statuses
You can set statuses for your manufactures to provide fine-grained control over your production process. Only Completed statuses deduct stock from your raw materials and increase your product stock. More information on production statuses
Auto manufacturing
If you're on an eligible plan, you can turn on Auto Manufacture to automatically create manufactures for your products, variations, or components when an order is created or imported. This saves you time and effort if you make products or variations that often use the same materials in every manufacture, or when utilizing components for product bundles or sets.
By default, the auto manufacturing setting will be off.
To enable auto manufacturing:
- Go to your Settings page, then select the Account Settings option from the menu that appears. (How to find your account settings page)
-
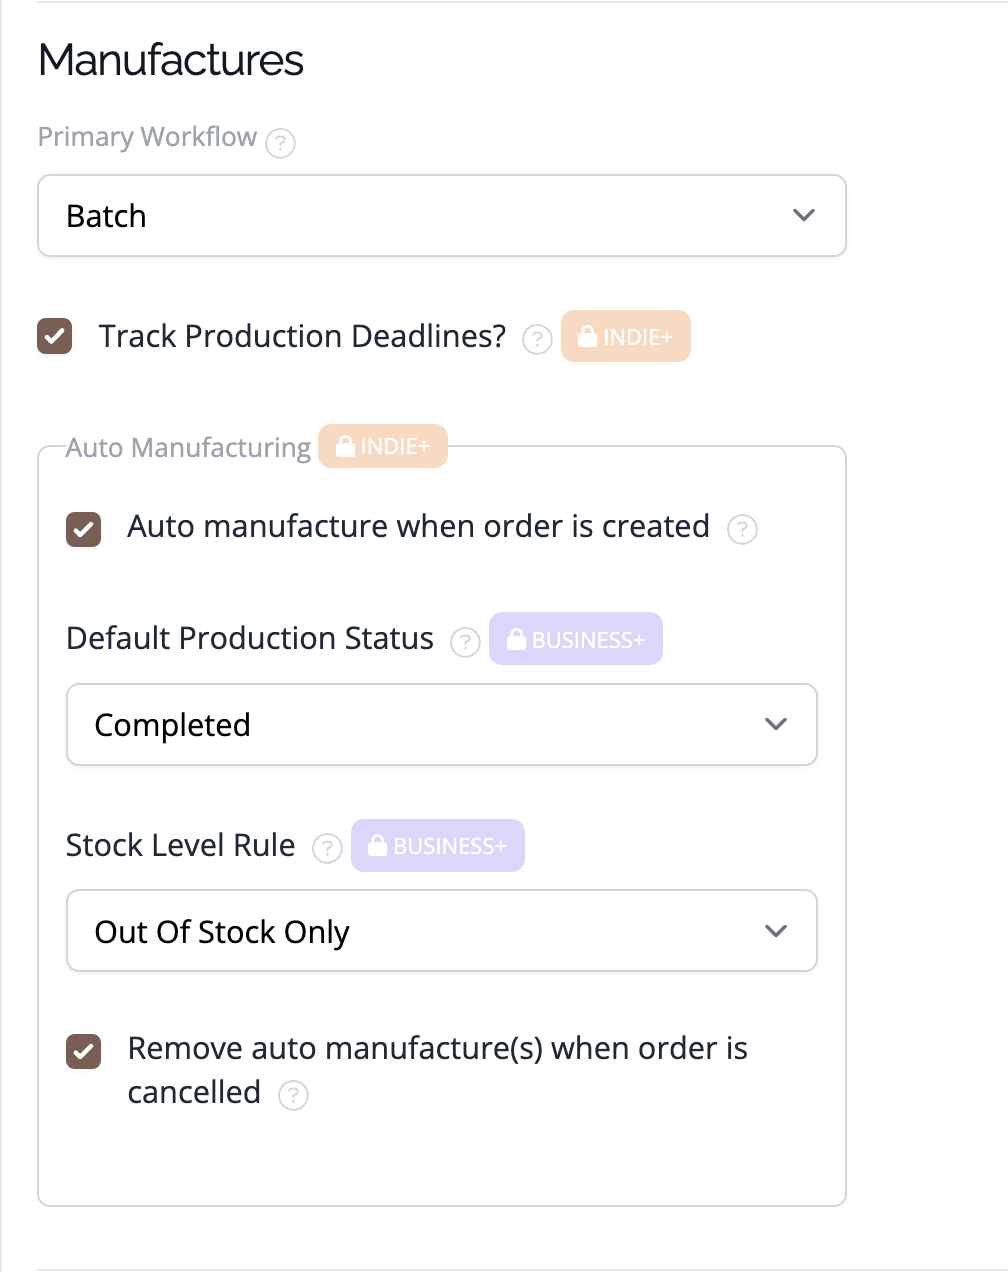
Scroll down to the Manufactures section and check the 'Auto Manufacture when Order is created' box.
-
Click on Save details at the bottom of the page.
When the remove auto manufactures on order cancellation setting is enabled, if an order is imported with a "canceled" status, the app will not create an auto manufacture for that order. Additionally, if an existing order is updated to "canceled," the app will automatically remove any associated auto manufactures. This ensures your inventory remains accurate and up-to-date by preventing unnecessary manufactures and maintaining accurate manufacturing records.
Assigning manufactures
Manufactures can be assigned to a user to enable you to see who is working on each product batch.
To assign a user to a manufacture, select the user from the Add or Edit Manufacture form dropdown.
Available in the following plans:
✗ Pro✗ Studio✗ Indie✓ Business✓ Growth

The assigned user also shows as a toggleable column in the manufactures list, so you can see who's working on each batch without opening it. Look for the column visibility picker (the table columns icon in the list toolbar) to turn it on — like assigning itself, this is available in the following plans:
✗ Pro✗ Studio✗ Indie✓ Business✓ Growth
Tracking labor costs
If you need to factor in your internal labor costs, you can enter the total number of minutes you spent working on the manufacture. This is the Total Labor Time (Internal) field on the manufacture form.
The Manufacture Time shown on a completed manufacture includes both your entered labour time and any component production time. When a manufacture includes component line items, the app calculates each component's production time using the formula:
Component time = (recipe minutes ÷ batch quantity) × component quantity used
These component times are added to your entered minutes to give the total Manufacture Time displayed on the manufacture. If a component has no recipe, or has a batch quantity of zero, it contributes 0 minutes to the total.
The pricing guidance the app calculates uses your total internal labour cost, which is based on this combined time and your account's hourly labour rate.
The Manufactures Summary Report also uses this combined total — time figures in the report include both your entered manufacture time and the calculated component time across all manufactures in the period.
Useful Features
Adding Notes to a Manufacture
Notes can be added to a manufacture to record any additional information about the production process. This feature is especially useful for:
- Documenting specific details about a production batch (e.g., adjustments to recipes, substitutions, or unexpected issues).
- Adding internal comments for team members about the manufacture.
- Keeping a record of quality control checks or production steps taken.
To add a note to a manufacture:
- Navigate to the Manufactures tab and open the manufacture you want to update.
- Click the "Edit Details" option located in the top right corner.
- Locate the Notes section, typically found near the bottom of the manufacture form.
- Click into the notes field and type your comments.
- Click Save to ensure your notes are stored with the manufacture.
Notes added to a manufacture will be accessible whenever you view the details of that specific manufacture after it has been created, ensuring that all relevant details are in one place for easy reference.
Attachments Section
The Attachments section allows you to upload and store files related to a specific manufacture. This is useful for:
- Attaching certificates, quality assurance documents, or compliance records for the manufacture.
- Storing photos of the finished product or the production process for documentation.
- Uploading receipts or invoices for materials used in the manufacture.
To add an attachment:
- Open the manufacture you want to update.
- Scroll to the Attachments section.
- Click Add Attachment or drag and drop your file into the upload area.
- Once uploaded, the file will appear in the attachments list.
You can view, download, or delete attachments from this section as needed. By utilizing attachments, you can centralize all manufacturing-related files, making it easier to access and manage your production records.
Generate a Tracking Label
Each manufacture has its own tracking label, useful for identifying a specific batch during production or in storage.
To generate a tracking label for a manufacture:
- Go to your Manufactures list and click the ⋮ icon on the manufacture’s row, then select Generate Tracking Label. You can also open the manufacture and select Generate Tracking Label from the menu in the page heading.
- The label downloads as a PDF — open and print it with your PDF viewer.
The label is formatted as 6"x4", the size of a standard shipping label sticker.
The label shows the manufacture’s batch code, the product name (plus the variation name if the manufacture is for a specific variation), and the completed date — or the start date if the manufacture hasn’t been completed yet. Scanning the QR code opens that manufacture’s page.
A manufacture’s tracking label points at that specific batch. This is different from a material tracking label or a product tracking label, which both point at the material or product’s detail page rather than one specific batch.
More ways to manage your manufactures list
A few other tools make it easier to work with a busy manufactures list:
- Drag column headers to reorder the manufactures list, and use the column visibility picker (the table columns icon in the toolbar) to show or hide optional columns. Your choices are remembered the next time you visit.
- Switch to a calendar view using the List/Calendar toggle to see your production schedule at a glance, and drag any manufacture that isn't yet completed to a new date to reschedule it.
Available in the following plans: ✗ Pro✗ Studio✗ Indie✓ Business✓ Growth - Select multiple manufactures from the list to update their status, start date, or assignee in one action.
Available in the following plans: ✗ Pro✗ Studio✗ Indie✓ Business✓ Growth - You can also bulk-set a deadline across multiple manufactures.
Available in the following plans: ✗ Pro✗ Studio✓ Indie✓ Business✓ Growth - See On Hand and Remaining material stock levels right on the manufacture form as you add materials. Remaining is a live calculation (On Hand minus Quantity Needed) that isn't saved, and it disappears once the manufacture is completed.
Troubleshooting
Common manufacture questions and how to resolve them:
- My stock levels aren't changing after I create a manufacture
- Material costs are showing as zero or a dash
- Auto manufacturing isn't creating manufactures for my orders
- The manufacture output quantity doesn't match what I expected
My stock levels aren't changing after I create a manufacture
Stock levels only update when a manufacture reaches Completed status. A manufacture in Not Started or Work in Progress status doesn't affect your inventory.
Creating a manufacture doesn't immediately change your stock — you need to mark it as Completed first. Until then, your material stock stays the same and your product stock doesn't increase.
- Open the manufacture and check its current status at the top of the page.
- If the status is Not Started or Work in Progress, update it to Completed.
- Check your stock levels again — they should now reflect the manufacture.
For more detail on how statuses work, see About manufacture production statuses.
Material costs are showing as zero or a dash
Material costs on a manufacture are only calculated when the manufacture is set to Completed. Before completion, the cost fields will show zero or a dash — this is expected behaviour, not an error.
- Check that the manufacture status is set to Completed. If not, complete it first.
- Check that your materials have a cost recorded. Go to Materials and open the relevant material — if no purchases have been recorded, the average cost will be zero, and the manufacture cost will also show as zero.
- If costs are still showing zero after completing the manufacture, see Troubleshooting manufacture costs for further guidance.
Auto manufacturing isn't creating manufactures for my orders
Auto manufacturing runs if either the account-level setting or the product's own setting is turned on — you don't need both.
Turning off a product's own Auto Manufacture checkbox doesn't stop auto manufacturing for that product if the account-level setting is on. The account setting applies to every product, and the product's checkbox will show as locked. To stop auto manufacturing for specific products only, leave the account-level setting off and enable Auto Manufacture on each product individually instead.
- Check whether the account-level setting is already on: go to Settings > Account Settings, scroll to the Manufactures section, and check whether Auto Manufacture when Order is created is ticked. If it is, auto manufacturing is on for every product, and each product's own checkbox will show as locked.
- If the account-level setting is off, check the product setting instead: go to Products and open the product. On the product's edit form, confirm the Auto Manufacture option is enabled.
- Check that the product has a recipe set up. Auto manufacturing requires a recipe to know what materials to use — without one, no manufacture can be created automatically.
- Confirm your account is on an eligible plan. Auto manufacturing is available on Indie, Business, and Growth. If you're on a lower plan, check the pricing page to see your options.
For a full walkthrough of auto manufacturing, see About Auto Manufacturing.
The manufacture output quantity doesn't match what I expected
The expected output of a manufacture is based on the Batch Quantity set in your product's recipe. If the quantity looks wrong, it's worth checking the recipe first.
- Open the product and go to its Recipe tab.
- Check the Batch Quantity field — this is how many units the recipe is designed to produce in one batch. If you make 12 candles from one batch of materials, this should be set to 12.
- If the batch quantity is wrong, update it and save the recipe. New manufactures created from this point will use the updated quantity.
- Note that updating the recipe won't retroactively change any completed manufactures — only new manufactures will use the corrected value.
See Add or remove a recipe for help setting up or editing your recipe.
Manufacture FAQ
Can I manufacture multiple products in a single manufacture?
No, you can only manufacture one product at a time in a single manufacture
Is it possible to get a timestamp for Manufactures?
While we currently don't have an automatic timestamp feature, a good workaround would be to manually add the timestamp in the "manufacture notes" section.
Can I set a manufacture completion date in the future?
No, a manufacture can't be marked as Completed if its Completion Date is in the future. If you're planning production in advance, the recommended workflow is to create the manufacture with a status such as Not Started or In Progress, then update it to Completed once production is finished. The Production Statuses option is available in the following plans:
✗ Pro✗ Studio✗ Indie✓ Business✓ Growth
How is my Internal Labor calculated?
Internal Labor represents the total labour cost involved in completing a manufacture, and it's made up of two parts:
- Manufacture Labor - The Labor Time you set when creating or editing a specific manufacture
- Recipe Labor - The Labor time defined on the product or component recipes used in the manufacture. Each component's labor cost is multiplied by the quantity used in the batch.
This combined total is what you see displayed as Internal Labor on the manufacture, giving you a more complete picture of the true labour cost involved in producing that batch.
For example:
- A product has 30 minutes of labor time in it's recipe
- You create a manufacture for 10 products
- You set the manufacture labour time to 60 minutes
This results in:
- Recipe Labor: 30 minutes × 10 units = 300 minutes
- Manufacture Labor: 60 minutes
Total Internal Labor = 360 minutes (6 hours), which is then costed using your account's hourly labour rate.
The same total (360 minutes in this example) is also what the app displays as the Manufacture Time on the manufacture detail page and in the Manufactures Summary Report.
Need Help?
Still have questions about using Manufactures in your account? Please get in touch, and we'll be happy to help.